

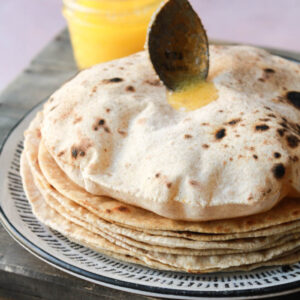
Phulka Rotis is India's one of the most versatile flatbreads. These Rotis appear frequently in Gujarati households and are popular throughout North India. I am sharing an easy step-by-step recipe along with a video to make these flatbreads with you guys today.
Every Indian household has its own way of making these flatbreads. It is different from region to region, village to village, and home to home. A very small example, the rotis we make have to be paper-thin, soft, and not too many charred marks on them. While rotis at my maternal grandma's home, are a little thicker, soft, and should be filled with charred marks. They will find the rotis uncooked without charred marks.
Roti dough was essentially my play dough growing up. This little girl loved rolling the rotlis again and again from the same dough. This rotli would be fondly eaten by my mum or my dad. They would always tell me how I am perfecting making rotlis every day. But that wasn't true. The roti they ate happily with a gleam in their eyes was actually flat and crispy.
Thanks,
Mum and Dad
Jump to:
- What are Phulkas?
- Are Rotlis Vegan and Gluten-Free?
- What kind of Flour to Use for Making Phulkas?
- How To Make Super Soft Rotis?
- How to knead the Roti Dough?
- How to Roll These Rotlis?
- Cook the Rotis
- Can we Freeze the Rotis?
- Can we Store Rotis in the Refrigerator?
- Video on How to Make Rotli
- Other Recipes You Might Like
- Phulka Roti
What are Phulkas?
India has a wide variety of flatbreads. While some flatbreads are leavened with yeast or yogurt, others are unleavened. Rolti or Phulkas are unleavened flatbreads. These flatbreads do not use raising agents and are cooked on the stove. Cooked on fire, these flatbreads are very rustic and impressive to make for your guests. Essentially, if you are not familiar with Indian Flatbreads, these phulkas are very similar to the Mexican Tortillas.
Are Rotlis Vegan and Gluten-Free?
Rotis are neither vegan nor gluten-free. But you can make them vegan and gluten-free. We finish off the rotli with spreading either ghee or butter. To make them Vegan use Vegan Butter. To make these flatbreads gluten-free we use Millets, Rice and Corn Flour. Although you will need to follow a different recipe to make gluten-free rotlis.
Here is a recipe that I have shared for Amaranth Flour Gluten-Free Roti
- Amaranth Flour Roti
- Garlic Naan
- Dudhi na Thepla
- Rajgira Bhakri
- Ringan Bateta nu Shaak
- Parat (Wide Mouthed Bowl)
- Rolling Board (Chakla, Addni)
- Rolling Pin (Belan, Velan)
- Non Stick or Aluminum Flat Pan
- Stainless Steel Tongs (Chipiyo)
- 2 Cups Whole Wheat Chakki Atta
- 1 Tbsp Oil
- ½ Tsp Salt
- 1 Cup Water
- 1-2 Tbsp Ghee or Butter
- Add flour to a parat or wide mouthed bowl.
- Add oil and salt.
- Give everything a thorough mix with your fingers.
- Now start with adding little water at a timeWith your fingers, keep mixing the dough.
- This will hydrate your dough well. Start bringing theflour together to make a dough.
- Once your dough is ready add a drop of oil to your palms, and start stretching the dough with your palms.
- Stretch the dough atleast for a minute. This step will make your dough soft and will give elasticity, which will help you roll the rotis.
- Once your dough is ready, add 3 drops of oil on the dough, and slather the dough with oil, to keep it moist. Cover and let it rest for atleast 10 minutes.
- Make equal sized dough balls, this recipe will make 12-14v equal sized dough balls, depending on the size you prefer. Roll each dough ball between your palms and flatten them. Keep them aside.
- Start the pan on high heat.
- Take a flattened dough ball. Dip either side in dusting flour.
- Place the dusted dough ball on the rolling board, and start rolling the roti with the rolling pin.
- The dough will roll in a circular motion when you start rolling your rolling pin with light, equal pressure. When the roti stops rolling on its own, dip in the flour on both sides again.
- Begin rolling again on rolling side.
- Don't worry if your roti doesn't look perfectly round. As long as it is evenly thick and remotely circular, you are good to go.
- You want your rotis to be about 2mm thick evenly, and 12-15cms in diameter.
- Slap the rolled roti on the hot pan. Rolling side on the bottom
- Once you see light bubbles popping, turn the roti and cook the other side, until you see light bubles popping.
- Now place the pan on another stove, and you will cook your phulkas on open flame.
- Place the phulka on the open flame, in 10 seconds flip and cook the other side. You will see scattered charred black marks on your rotis and that's what you are looking for on the either side of the rotis.
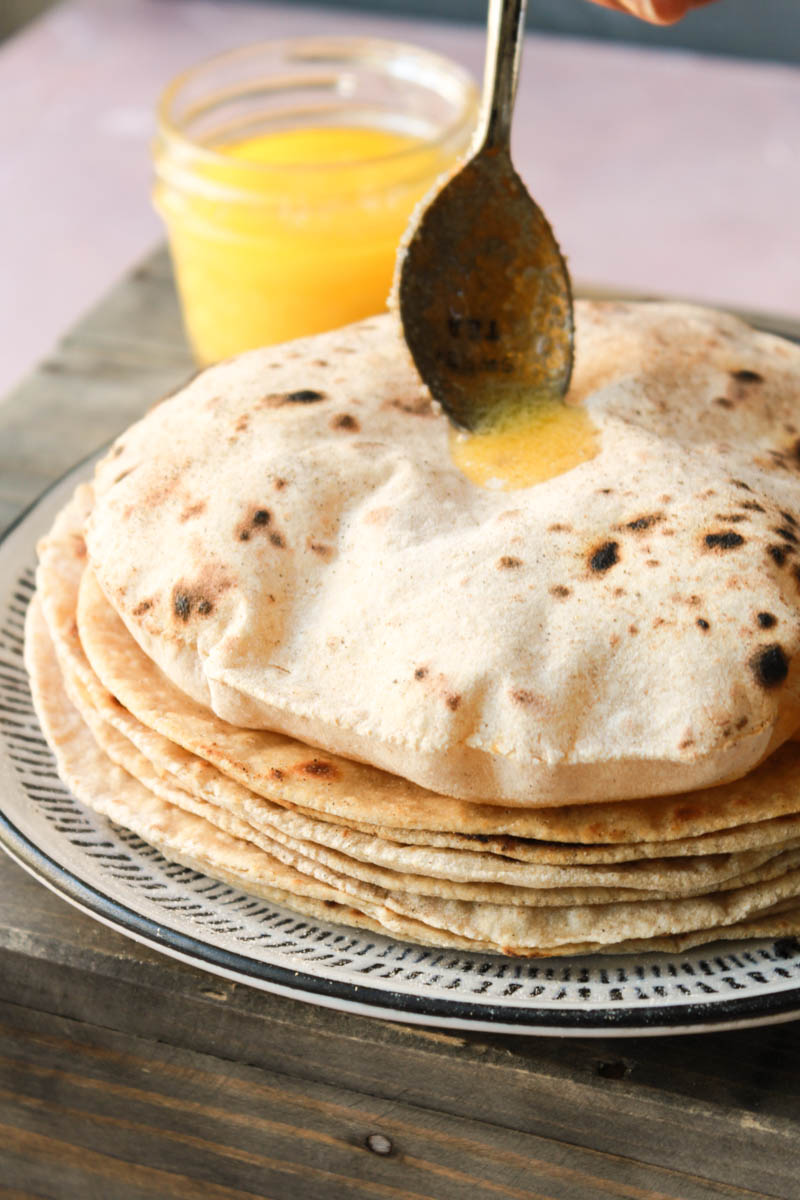
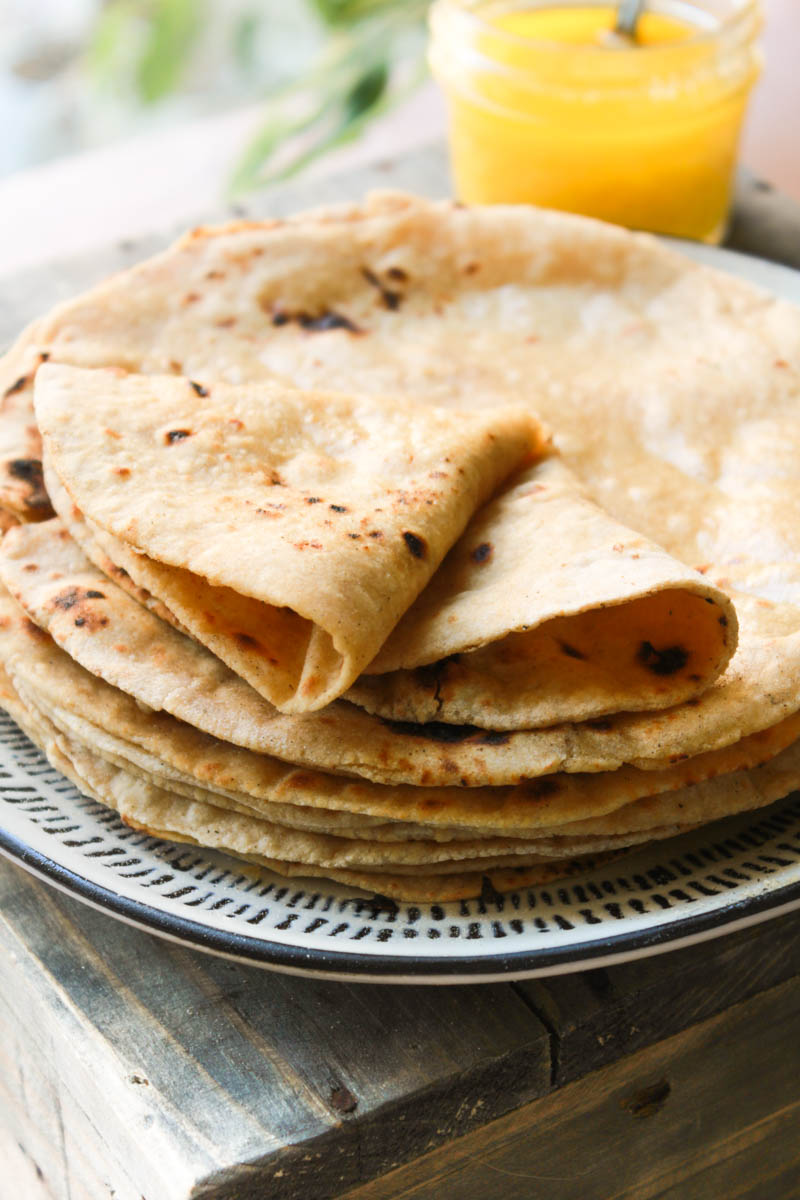
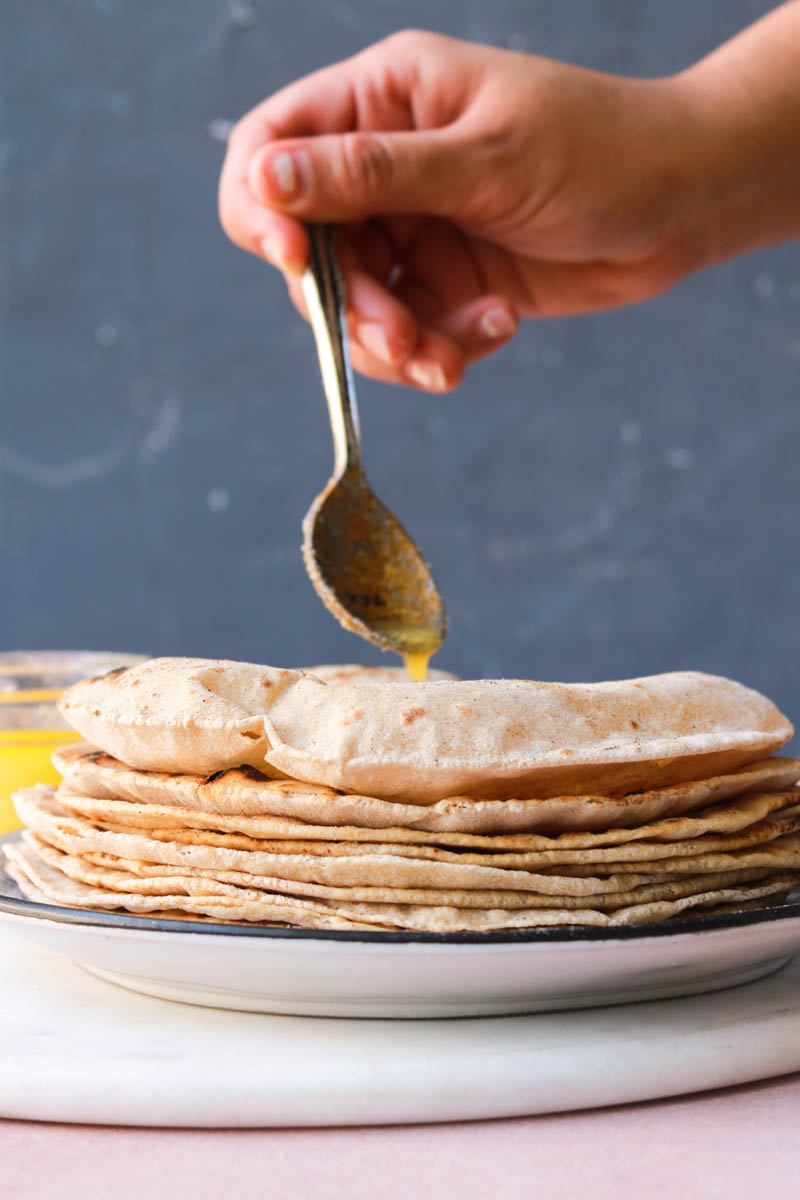
- Once done, slather your hot phulkas with ghee or butter.
- If you don't want to cook your phulkas on open flame, continue cooking them on the pan. Same way 10 seconds on each side.
- Repeat until all the rotis are cooked.
- When your pan gets very hot and you notice your rotis cook up faster or are burning, lower down the flame to medium and continue cooking the rotis.
- Don't pressurize to make perfect rotis the first time. Making perfect rotis comes with practice. So keep practicing.
- As long as your rotis are not burnt, they are good to eat.
- Once you get a hang of making Rotis, you will be able to roll and cook the rotis at the same time and work in a rhythm.
- Read the blog thoroughly to make sure you know all the details
- Watch the video again and again, until you make sure how to cook.
What kind of Flour to Use for Making Phulkas?
We use wholewheat flour or "atta" to make these rotis. There are many different varieties of atta available in the stores these days. Chakki atta works perfectly to make rotlis, for their perfect taste and texture. Wholewheat flour is ground from the whole grain without removing the bran. The chakki atta or any packaging that shows Rotis, are the wholewheat flours that are milled a little extra to ground the whole bran twice and make it as fine as possible. Some brands that I have used here in the United States are 24 Mantara Organic Whole Wheat Atta, Deep Indian Kitchen Sharbati Atta, and Royal Chakki Atta.
If you use all-purpose flour to make these rotis, they will have a very chewy texture.
How To Make Super Soft Rotis?
Gluten is wheat's natural protein. These proteins develop when the dough is kneaded properly, making the dough soft and elastic. The elasticity of the dough helps in rolling the rotis and the soft, smooth texture of the dough, makes the rotis super soft. There are 3 essential steps in making rotlis. They are kneading, rolling, and cooking the rotis.
How to knead the Roti Dough?
I cannot emphasize enough but start with using the right flour to make these phulkas. You want to specifically go hunt for chakki atta. I prefer to add oil and salt to the dough along with water. The oil that is added to the dough is called "moin". This helps in making the rotis softer. To knead the dough, I start by adding my flour to the parat.
Parat is a wide flat dish with higher sides. This particular vessel helps gives you enough room to knead and stretch the dough and the higher edges, making sure the dough doesn't spill. Always use your fingers to knead the dough. Add little water at a time and start hydrating the dough. The water in the dough becomes steam, and that's what helps your rotis to puff up. Bring the flour together to form a dough, and start stretching the dough with the palm of your hands. Repeat stretching the dough at least for a minute.
Add a little bit of oil to the dough, cover, and let it rest for at least 10 minutes before rolling the rotis. Your sign to know the dough is ready, are the white dots on the dough. These white dots indicate that gluten is developed in the dough, and it is ready to be rolled.
How to Roll These Rotlis?
After your dough is ready, divide the dough into 12 equal parts. Roll each dough ball smooth and flatten them between your palms. Now one by one start rolling them. These rotis should move in a circular motion on their own. This is achieved by making sure you dust your dough ball well with the dusting flour. You can either use Rice Flour or Atta as the dusting flour. Rice flour helps to roll rotis more smoothly.
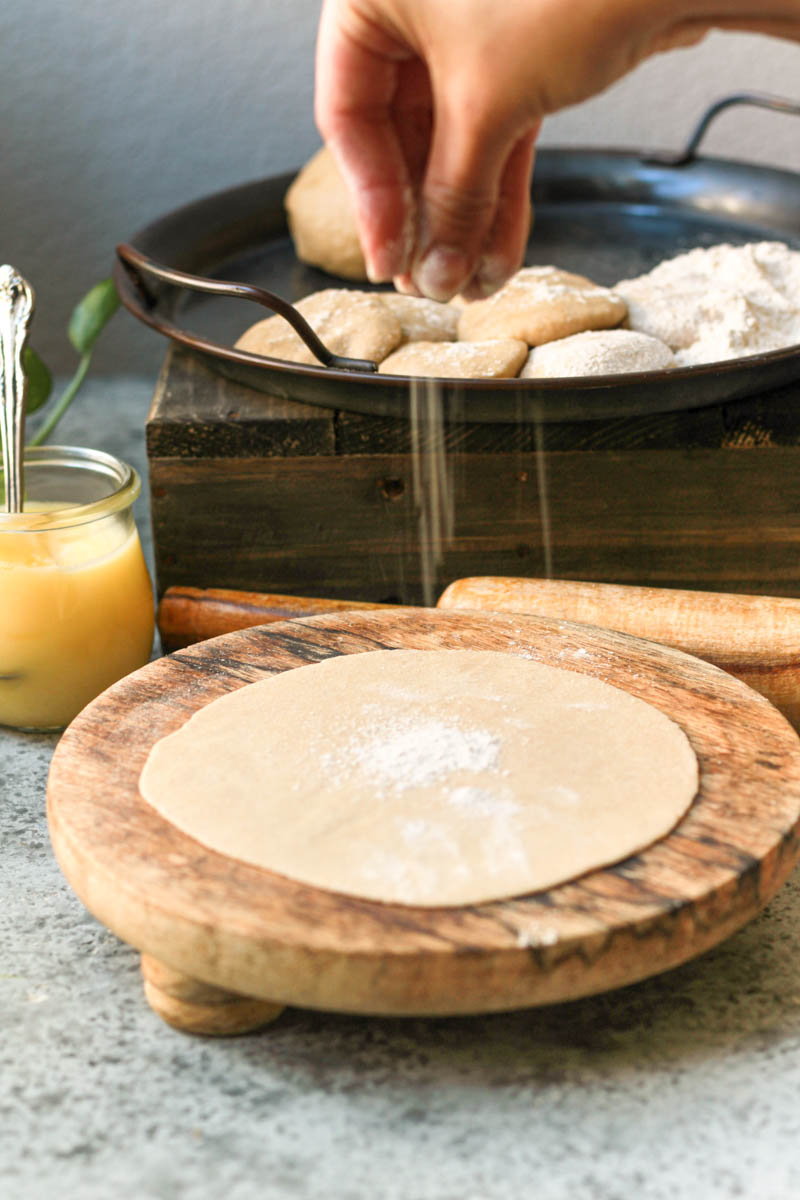
When you are ready to roll the rotis, place the flattened dough ball in the dusting flour, and press it down with your fingers on both sides. Once your dough ball is covered with dusting flour, place it on your rolling board aka your "aadni" or "chakla".
Use a rolling pin to start rolling the rotis. Apply very little pressure to roll the rotis. You will see your roti will begin to roll in a circular motion. Dust both the sides of the roti again if your roti stops moving on its own. Just make sure to remember the top side of your roti, because you roll the roti from the same side as you were before dusting.
The rotis should be approximately 2mm thick, and about 12-15 cm in diameter.
Don't worry if your rotis are not perfectly round. It comes with practice and more practice. As long as your roti is equally thick from all sides and remotely circular you will be okay.
Cook the Rotis
The easiest and the hardest part is cooking the rotis. Once you become a pro, you will have your own ritual to make the rotis. But for now, you will have to follow mine, if you are new to making Rotis.
Start the pan or lodhi on high heat. You want your pan to be hot. So when you slap your rolled roti on the tawa, it takes minimum time for it cook, this is the key as it makes the softest rotis. The longer it takes to cook the roti, the chewier it becomes.
You slap the rolling side, which is your top side on the Tawa. Once it starts to lightly bubble, you flip it. Now when both the sides are lightly cooked, you move the Tawa gently on another stove or side and place the roti on the flame until it puffs up or flip the roti in 10 seconds. Place the roti on a plate, and slather it with ghee or butter.
Can we Freeze the Rotis?
Yes, you can. Freezing uncooked phulkas gives better results than freezing them cooked. I like to layer the Rotis with parchment paper as I roll them. And then pack them us tightly in tin foil. Place the aluminum foil in a freezer-safe reusable zip lock bag, and date them. I try to finish them within a month. But they are good for up to 2 months. Cook them frozen like a regular roti. Don't dethaw them. The rotis won't hold their shape and cooking them will be a nightmare.
Can we Store Rotis in the Refrigerator?
Yes, you can. If I have few leftover rotis, I either pack them in aluminum foil or an air-tight round container for up to 3 days. I reheat them for 30 seconds in the microwave and they are ready. They taste better when you slather them with some ghee or butter after reheating the rotis.
The rotis will stay soft after reheating. The oil and salt in the dough helps the rotis to be soft for a longer period of time.
Video on How to Make Rotli
Other Recipes You Might Like
Phulka Roti
These nutrional values are automatically generated. Use them for estimation only.
Equipment
Ingredients
Instructions
Make the Dough
Roll the Rotis
Cook the Rotis
Notes
Sukhi Bhaji | Batata ni Sukhi Bhaji | Faral Potato Bhaji(Opens in a new browser tab)
Churma Ladoo | No Fry Churma Ladoo Recipe | Churma na Ladva(Opens in a new browser tab)
Methi Crackers | Wholewheat Methi Crackers(Opens in a new browser tab)
Atta Halwa | Gujarati Wheat Sheero(Opens in a new browser tab)

Your Thoughts